What is Wrindu SF6 Gas Recovery and Purification Unit and How Does It Work?
Wrindu SF6 Gas Recovery and Purification Unit efficiently recovers, purifies, and refills SF6 gas used in high-voltage equipment, ensuring safe management and cost-effectiveness for electrical utilities.
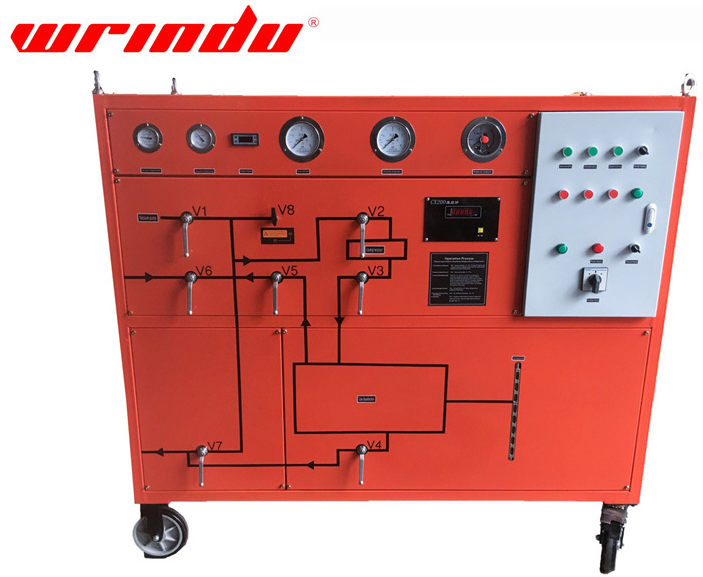
The SF6 Gas Recovery and Purification Unit is a specialized piece of equipment designed to recover, purify, and refill SF6 gas used in high-voltage electrical equipment. SF6 (Sulfur Hexafluoride) is widely used due to its excellent insulating and arc-extinguishing properties, but it is also expensive and can decompose into harmful byproducts. The SF6 Gas Recovery Unit ensures the safe and efficient management of SF6 gas, making it ideal for industries such as electrical utilities, power stations, and other facilities that use SF6-based equipment.
Key Features of Wrindu SF6 Gas Recovery and Purification Unit
| Feature | Description |
|---|---|
| Built-in Filtration and Absorption System | Absorbs impurities, moisture, decomposition products, and oil from SF6 gas to ensure clean recovery. |
| Compact and Integrated Design | Small size and integrated structure make the unit easy to move and use in various settings. |
| High-Efficiency Maintenance-Free Filter | Ensures high-quality SF6 gas recovery with a filter that does not require regular maintenance. |
| Phase Sequence Protection | Prevents issues caused by phase sequence errors, ensuring correct operation. |
| High-Quality Electrical Components | Built with reliable, durable electrical components to ensure safety and long-lasting performance. |
| Easy to Move | Equipped with high-quality casters to protect floors and reduce labor when moving the unit. |
| Air-Cooled System | The unit is air-cooled, eliminating the need for an external water source. |
| Temperature Protection System | Operates safely even in temperatures as low as -20°C with an integrated temperature protection system. |
| Built-in Drying and Heating System | Regenerates desiccant by heating, preventing the need for frequent replacements. |
| Automatic Compensation Ball Valves | Sealed ball valves with automatic compensation to avoid leakage and maintain system integrity. |
| Electromagnetic Valve Protection | Prevents vacuum pump or motor seizure by cutting off power when needed, protecting the system. |
Specifications of Wrindu SF6 Gas Recovery and Purification Unit
| Specification | Details |
|---|---|
| Product Model | RDQH-60/200 |
| Power Supply | AC 380V, 50Hz (automatic phase sequence conversion) |
| Maximum Gas Storage Pressure | ≤4 MPa |
| Vacuum Maintenance | Maintains vacuum pressure at 133 Pa for 24 hours; vacuum rises <400 Pa |
| Compressor | Shenyang Gulun |
| Vacuum Pump | Direct coupled pump |
| Inlet Pressure Range | 0~1.0 MPa |
| Final Recovery Pressure | ≤50 kPa |
| Oil Content After Recovery | <10 μg/g |
| Noise Level | ≤75 dB |
| Storage Capacity | 200 kg |
| Cooling Mode | Air cooling |
Why Choose Wrindu SF6 Gas Recovery and Purification Unit?
| Reason | Description |
|---|---|
| Efficient Gas Recovery | Built-in filtration and absorption system ensures effective recovery and purification of SF6 gas. |
| Compact and Portable | Small design and casters make the unit easy to move between work sites for increased flexibility. |
| Low Maintenance | High-efficiency, maintenance-free filter and built-in drying and heating system for long-lasting performance with minimal upkeep. |
| Safety and Reliability | Includes safety features like temperature protection, automatic ball valve compensation, and phase sequence protection. |
| Versatile Operating Conditions | Operates in temperatures as low as -20°C and handles pressures up to 4 MPa, making it suitable for various environments. |
Applications of Wrindu SF6 Gas Recovery and Purification Unit
The SF6 Gas Recovery and Purification Unit is ideal for use in industries and applications where SF6 gas is commonly used, such as:
- Electrical Utilities and Power Stations
Ensuring safe and efficient recovery of SF6 gas used in circuit breakers, transformers, and other electrical equipment. - SF6 Gas Manufacturing and Maintenance
Supporting the manufacturing and maintenance of SF6 electrical equipment by providing a reliable method to recover and refill SF6 gas. - Gas Purification and Filtration
Purifying SF6 gas to ensure it meets the required standards for reuse, preventing contamination and enhancing equipment reliability.
FAQs
Why is my recovery time much longer than the manufacturer’s specification?
A: The issue is likely caused by undersized equipment or long hoses. Long hoses increase resistance and slow down gas flow. To speed up recovery, use equipment that matches the gas volume and shorten hose runs. Avoid using a “mini” service cart for large equipment as it can stress the compressor and increase downtime.
How can I tell if the internal purification filters are removing contaminants?
A: To check, compare gas quality before and after it passes through the unit. If the post-recovery purity is the same or worse, the filter’s desiccant is likely saturated and needs to be replaced or regenerated. Adding a pre-filter can help protect the main unit from contaminants like SO2 from arcing in breakers.
I reached 0 PSI on the gauge, but the system says recovery isn’t finished. Why?
A: 0 PSI doesn’t mean a full vacuum. There is still gas remaining at atmospheric pressure. To prevent emissions, always recover to “blank-off” pressure (<1 to 5 mbar). Stopping at 0 PSI can leave up to 15% of the gas in the equipment, which will be lost when the breaker is opened.
How do I prevent damaging the unit when running it from a portable generator?
A: Don’t start the recovery unit at the same time as the generator. Wait 10 seconds for the generator to stabilize before turning on the unit. Starting the generator can cause a voltage surge that can damage the unit’s sensitive electronics.
What should I do if the gas is extremely contaminated with toxic SO2?
A: If the gas contains high levels of SO2, neutralize the equipment and rinse it with nitrogen. After handling contaminated gas, use a 10% lime or soda ash solution to clean any tools or hoses. If the contamination is severe (acidity >4,000 ppm), it may need to be sent to a specialized facility for proper disposal.
You might be interested in